
 Every once in awhile you will see a flurry of people making paste paper. Why not? It is inexpensive, a good way to use up old paint and the paper is beautiful. People have been painting on paper this way before there was indoor plumbing.
Every month I meet one morning with a group of local artists. Besides our exchanges we try to do a project every month or so together. One person usually teaches the group and a good time is had by all. This month it was my month at my house so I decided at the suggestion of several people that we would do paste paper. Plus, it is this month's technique for another group I am in. Two birds one stone, Yeah. Now, I know that there are several ways to make this. You can use flour and cornstarch, I have heard of flour and baking soda and salt. All cooked, cooled and paint added. What a mess.
Needless to say, if I am going to spend all that time cooking I want to eat. So I do it a much simpler, immediate, and less messy way. I buy wall paper paste. Ace hardware has powdered paste while the big hardware stores carry the pre measured liquid paste. I used the liquid paste this time. With the powdered paste use two parts paste to one part paint. With the liquid paste we poured it into plastic containers, then added paint. I would use the 2/3 paste to 1/3 paint formula. Just make sure you mix the paint and paste well. We used chop sticks to mix all of the paint.
Next, you will need some containers for the base paint, foam brushes, old credit cards, combs,scissors, string, paper, and grocery store paper bags. We covered our area with freezer paper, cut the paper bags into one long piece and lay in an area that won't get any traffic. This is for you to lay your painted papers on to dry. Each bag will hold about four 8 by 11 sheets of paper.
Paper, we used a sketch book type paper. It is sturdier than copy paper but flexible so you can use the finished paper to wrap end covers for books, etc. Card stock is not real flexible but nice for bookmarks, cards, etc. This is just something you will have to experiment with.
Next, you want to assemble some combs. You can literary use combs and cut some of the teeth out to make a more appealing pattern. Credit card can be notched to make neat patterns. All those fancy scissors can be used to cut patterns onto cardboard or credit cards. Several paint places carry tools for creating patterns in paint for reasonable prices. Check your kitchen you probably have things there you are not using. However, remember that once you use it to put paint on you can't use it with food.
Now to make the paper. Use a foam brush for each color, things will move faster. Lay several sheets of paper down in your work area. Cover them with plain acrylic paint. This will be your base color. I like to use metallic' s for this, it gives a pretty shine. You can just have a plain white background if you like. After the base paint has completely dried take the paint and past mixture and with a foam brush paint a thin layer over the entire piece of paper. Then grab your comb device and start making patterns through the paint paste. Set paper aside to dry.
Some hints - make the paint paste layer thin, it makes a prettier pattern and dries faster.
If you don't like it, use a credit card to smooth the paint paste and start again. Pick contrasting colors. Move fast, don't think to much. Have fun... Try to use up all your paint, throw in trash not down your sink when you are finished.

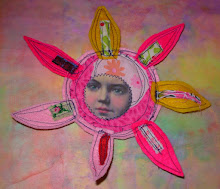
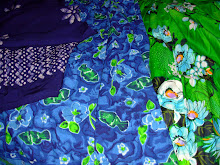
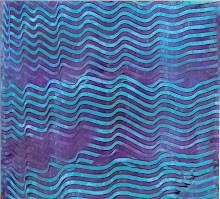
This is a plain white piece of paper with just purple paint paste on it.


8 comments:
Great tutorial, Elizabeth! Your paste paper workshop looks like it was a lot of fun! We'll have to give it a try!
Thanks for the info and examples Elizabeth!
Very nice, I made some in a class but haven't ventured on my own. Have the stuff just need the ambition.
Hi Elizabeth,
I haven't visited in a while and when I do, lo and behold, all about paste painting. This is something that I do all the time, teach in workshops and generally love to do. Obviously, you do too! Great work and a really complete, nicely done, tutorial.
Lorrie Grainger Abdo
Hi Elizabeth, I have just discovered your wonderful blog. I have just spent a really enjoyable hour reading and enjoying your photos and freebies. I love your barn series of photos! Are your a trained photographer? Your Photos are amazing. I love your quotes and yopur art work!!!
thanks so much for the technique - I've heard of paste paper but never made any. sounds like a good, fun group project!
I especially love the metallic ones - Ill remember this one for sure.
Have a great night!
Great! Thank you for the explanation.
Here in Brazil we can't buy easily this kind of glue. Then we try the same with Elmer, a little bit of water glue and acrylic paint to ad color. The best you use a kind of paper that has a little gloss. Before all is dry you can write on it, make designs with combs, sticks or whatever you want.
Thanks for the Paste Paper tute! I almost have my tools gathered and will be doing this very soon.
I also want to tell you that I really like your banner? with all the doors, its so cool, Its something that I always notice and have been wanting to tell you forever!
Post a Comment