Tuesday, July 1, 2008


This is my six 1/2 by six 1/2 quilt square for an exchange I am in. We are to make one square a month. Each month has a color theme. We do this for eight months and the ninth we make for ourself. This month - the first month - the theme was green. I sent this square to this month's partner. We should get one square from each person. I am making two squares each month so that I can put together two art quilts when the exchange is over. Next month is Yellow.

Needle Felted ATC's


Last week I received my new issue of 'Paper Clothe and Scissors" magazine. I don't know about you but I love this magazine. I always try to do at least one project out of each publication of every art magazine I get. That to me is the purpose of reading these magazines. To be inspired and learn new techniques. The article by Kelli Perkins was inspiring. Plus, I already had a rainbow of roving and the needle felting tool.[ Someone had convinced me a year ago I simply had to try it.] Lots of left over felt sheets from a previous project. Some beads. I think I had everything I needed.

So, with magazine at hand, a comfortable chair and a good movie I was off. These are my first samples of needle felted ATC's. Remember they are my first stab. I can see how I progressed. The flowers were fun. I decided to make my own garden. The birds nest was off the cuff. Lack of brown roving sent me to the yarn pile. The results were better than expected. I found the whole process to be extremely relaxing.The jabbing definitely gets out any inner frustrations. Also , a little bit of roving goes a long way. I also machine stitched on most of the ATC's . I like the effect and it sort of just binds it all together. The beads glam it up and make it all sparkling. Sparkling is good.

EEK! a Spider

This morning was very cool out. In the 70's. I decided to read the paper and do the crossword puzzle out on the patio. About half way through I glanced over by the corner wall where I have this lovely pedestal and look what I found. A black widow spider.

She is a perfect specimen. The "violin" pattern is the best I have ever seen. Unfortunately, my camera did not pick up how red the pattern appears to the naked eye. She was quite docile and let me get my camera about three inches away from her. I think the cool weather had something to do with that. Unfortunate for her, we did have to go separate paths for my families safety.

The black widow's bite is quite painful. It feels like someone has ground out a cigarette on your body for several minutes. I have had the unpleasant experience of having been bit by one. She came in some new furniture we had bought. Instead of cleaning it out well - it was new - I just lined the drawers and put the clothes in. Several months later I popped on my bathing suit and went out to get some rays. As soon as I laid down on the lounge chair I felt this hot pain right below my belly button. I could not get that suit off fast enough. I felt like Goldie Hawn in that movie "Bird on a Wire" and she is in the shower and the cockroach falls on her. You sort of get the picture.

Sure enough there was a very small black widow. She liked the lining in my suit. The wound were she bit me swelled up with a blister in the center. You could actually see the two little fang marks the skin was so swelled. It was pretty nasty. I had to take antibiotics and keep a very close eye on it. I actually was very lucky. It took about three or four weeks before a seat belt even felt comfortable. I do have a small discoloration where I was bit and a small scar where the bite was. Two minute holes.

p.s. My bug guy is coming to spray tomorrow.

Sunday, June 29, 2008

"Art" a Chunky Altered Board Book


This little chunky board book is about 3 inches by 3 1/2 inches. I bought 26 of them at a yard sale for $2.00. I have altered quite a few and given away quite a few. This one I decided to use a lot of stamps and scrap paper.

I peeled the paper off on this book. Mostly because the book is small and it was easy to get the paper off. I had a few days of spraying tags and miscellaneous pieces of paper and fiber with spray inks. Some of the ink I make myself and some were purchased. I spray in a fairly deep box that I line with cheap printer paper. I change the printer paper out when I go to a new color family. The background paper in this entire book is that cheap printer paper sprayed randomly with ink.

I chose a theme - Art. Pulled out some "art" related stamps and went to work. The cover is a transparency stamped and applied to the cover with brads. I split the cover page in half, applied brads then reglued the page together. I used clothespins to hold in place till dry. While the cover was drying I assembled some embellishment and inks.

Once the cover was dry I covered all the pages with the recycled printer paper. Then I just started working. The third page is a niche that I put the torso in. The torso reminds me of a figure sketch class that you might take. The last page has one of my dirty paint brushes cut down to fit the page and glued on. My favorite part of this book was that it truly was just a whim. One of those "what should I work on?" moments. I hope you will look at the things lying around your creative space and get inspired.

One Image - Three Ways


These are for your personal use. I hope you can find a place in your art for her.

Cheese and Beer Dip

Now what could be better than some warm pumpernickel or rye bread cut thin with cheese and beer? Maybe some fresh marinated tomatoes. Especially on these warm days and nights. You could add a salad and this could make a nice summer meal. Something light. Or maybe something to take to a Fourth of July get together.

Prepare and mix in a bowl.
3 cups grated Sharp Cheddar Cheese - 3/4 pound
1/3 cup - 1 1/4 ounce - crumbled Roquefort or Blue cheese
Add 3/4 cup beer, without foam, gradually, stirring constantly until mixture is smooth.

Blend in
1 tablespoon butter - softened
1 1/2 teaspoon grated onion
3/4 teaspoon dry mustard
1/2 teaspoon Worcestershire sauce
2 drops Tabasco or Texas Pete sauce

Cover and chill thoroughly in refrigerator.
Makes about 2 cups.

Garage Sale Finds


It was ninety degrees at 8:00AM this morning. I knew it was going to be hot so that meant a quick morning with maximum sales. So I headed to the local high school where they were having 22 plus booths. I found the tin for 25 cents, two 1950"s cookbooks for 50 cents, the cute doll clothes - all for 25 cents, and a piece of material around three yards for 50 cents and they threw in some silk flowers. Hot and cranky people and only 8:45 AM.

I don't know about you but I have found there are four types of sales. The neighborhood sale, the Church or other organization sale, the moving "let's dump it all sale", and the organized sale. Each one has it's own unique treasures. Today was a "let's dump it sale" day. I like to go to neighborhoods that people don't have a lot of disposable income. They tend to spend their money on quality items because they will not be replacing them anytime soon. They also tend to hold on to things hoping to find a use for it or they remember how much they spent on it. These people tend to have the goods I like.

I found three sales on the same street with lots of treasures. The first house I bought my McCoy vase - $3.00. My big purchase so far. Then on down the street where I found still in the box a charming earring tree, metal, with a little birdhouse and blue bird on top - a big 25 cents. Onward to the next house. This place was different. Old surfer dude and wife. He had made fish out of broken surf boards and sold them to restaurants all over the south. They weren't for sale, but he was interesting to talk to and see his shop. I'll post later on him, it was rather amazing.

The surfer dude had a lot of bottles and rusted items. I bought a couple of bottles - I think I have a bottle thing going on - and a rusty old grater and spatula. The spatula had a heart cutout on it. These could be fairy wings in the future. He also had a Bakelite handle button hook and cake icer, a silver soup ladle, and old first aid kit complete with supplies, a cake decorating set - I am thinking polymer clay - and a very heavy fox head ashtray or dish made out of copper or bronze. Then I spied this old wooden cigar box filled with tumbled and polished rocks - $4.50 for the surfer dude. This is my haul for today. Time to go home and have something cold to drink and cool off.

Friday, June 27, 2008

Downtown


This morning was one of those mornings where you just know you have to get up early and "do something". I live in a beach and riverfront community. The weekends mean TOURIST and lots of traffic. If you want to get anything done you have to do it early. Particularly on Friday. After about one PM forget it, the roads start to clog. So this morning I went to the River Front and downtown to take pictures. One thing about going early is that the only people out are the restaurant delivery trucks. As I left the waterfront I went down Second Street [one street up from the water] where all the clubs are and found this great wall of posters. About fifteen feet high and maybe forty feet long. These are a couple of photos I thought I would share with you.

Tuesday, June 24, 2008

Kayak Morning

Monday, June 23, 2008

It's June...I Hear Wedding Bells


It's June and all over the country people are planning weddings. Outdoor weddings, same sex weddings, beach weddings, formal church weddings, visiting the Justice of the Peace....every where spring has sprung, love is in the air, young and old, couples are making commitments. We even have a wedding coming up in my family. So in honor of the happy couples here are some free images for you to use in your art work.

A Very Small Altered Board Book


This is one of those two and three quarter inch kids chunky board books. They don't take a lot of time and are really fun to do. This one I glued dictionary pages on every page. Then I lightly gessoed over them making some areas heavier than others. I then inked the pages. I selected this handmade paper with brass dots over it in a leafy swirl pattern. This was the third element to bind the book pages together. Randomly tearing this paper and gluing it down gave me a background for the main images.

I selected butterflies and flapper women as my main images. I used a variety of stamps and embellishments. Even an old butterfly pin from my childhood. The window is for a doll house that a friend had given me when I was going through a heavy window thing. The niche is two pages glued together after the hole was cut and finished. I filled the niche with my image, a key and some sparkling gold beads to roll around. Then covered the niche with mica and secured with eyelets. Then, I glued the two pages together forming the completed niche.

This is a quick and easy altered book. I think this would be a fun book to do with a child. Maybe a rainy day project for the summer. It would make a nice animal or dinosaur book. How about fairies, mermaids or the ocean. You could use a lot of scraps from your work table to complete.

Glue Books


Glue Books are a wonderful way to recycle all those magazines you can't bear to throw away. Cut the images and words that attract you and store them in a zip lock bag. I sort my images into one and my words into another bag. Then toss those magazines. You will feel a hundred percent lighter.

My glue books are really just starters and motivators to work on other projects. Sometimes you feel like your muse has gone on a little vacation without you. A glue book is a way to bring that girl home. I start with just a small blank book - six by eight or so. I use left over paint to swipe my pages with to just give me a little background color. I put wax paper between the sheets and let it dry. Depending on how much paint I have left over and what I am painting I might get five to ten pages prepped. Then I set aside till the "blank wall"hits.

I am sure you all have had that feeling where you want to create but nothing comes to mind? I hope I am not the only one out there that gets this way. Then I grab my bags and dump them on a tray and my book and just sort of play with them. Or, I grab a few words and see what that brings to mind. Once I have a few images and words I start gluing them in the book. I might play for an hour or so till I have filled a few pages and feel like I have some ideas. Maybe it is color or a notion but I am usually ready to move on to other projects. Maybe it is the act of gluing I don't know. I just know at this point I am motivated.

Two things... First as I read through several years of these glue books I find that they answer things that have been rolling around in my sub conscious. Problems, questions, life events... they seem to mirror. Maybe that is why my muse is on vacation.

Second... there are several yahoo groups that are exclusively about glue books. One with Lisa Vollrath that is called Glue Books. You can meet a lot of like minded people through them. The other that I love is Gluebots. They glue calendars, 4 by 6's, swap, and have exchanges, etc. Great people here. Whatever you decide to do ...learn to recycle things into your art and have fun doing it.

Skinnies - Three by Five


These are my Skinnies /3 by 5 / for an exchange the Yahoo group Gluebots is having. We had no theme just make four and send them to the hostess. Of course I got a little motivated and made twelve. They are addicting. I like the size. I think it is because I have been making so many ATC's that I just needed a different format.

More Bandana Art

More Bandanna art. I am finding this technique to be additive. So much fun when you have just a short period of time or you are waiting for an appointment. Also very mobile. I did these with the dishwasher repair man here on and off for two days. There are several groups on line doing monthly challenges with this technique. How fun!

Gel Image Transfers


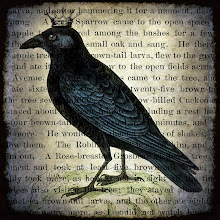
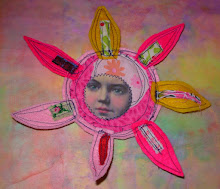
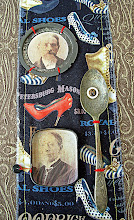
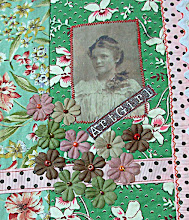
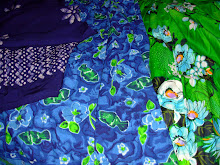
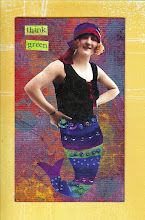
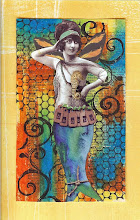
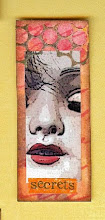
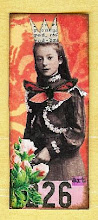
These are some tags I made this weekend. I think they will go into an altered book I am working on. It is one of those things that is just sort of brewing. The book is there, some embellishments are gathered, and the tags just sort of fell into place. How I did them....

They are images transferred onto the tag using gel medium. First I gathered the tags and used Color Box Chalk Inks to ink the tags, mostly around the edges. Then the images were selected. I printed them on to Office Max transparency film for inkjet printers. I then applied gel medium - Regular Liquitex Gloss- to the tag.

There is a lot of debate about gel mediums and which brand is better. I don't want to go into that. I find each brand has a purpose and if used correctly does a great job. I like this -Liquitex- because it is creamy like mayo and spreads really well, plus I bought a gallon for ten bucks and the price was great. That affords a lot of experimentation on my part.

So back to the tag.... I apply the gloss with a foam brush then run my finger over the gloss to make it smooth. Then lay the transparency on the tag - ink side down - and hold in place and rub with a bone folder or spoon to transfer the image. You can peel back the image some to check the transfer. Sometimes you have to lightly apply a little more gel in some spots and re- rub. I start rubbing the head first and go down and out. This is just "my way"of doing it.. Then pull up transparency and Voila the image is transfered. If you don't like the gloss look you can use matte gel it works the same way. Sometimes I transfer with gloss and then when dried I go back over it with matte gel. These I left glossy like a photograph.

Once the image is dry you can finish the tag. I applied more ink, stamped, collaged paper and added fabric flowers and buttons. Fibers will be added to the top of the tags at the end. They are hard to scan with the fibers everywhere.

There are many online resources for transferring images. There are several yahoo groups. For me the most helpful group has been the Inkjet Transfer group run by Lesley Riley. She is the guru of transfers. And this group has some "in the know" people. They have the answer to every imaginable question. There art work is great, also. I also suggest taking a class in transfers. You can transfer onto about every surface....metal, plastic, fabric.. There are several good books out there. I actually like the Somerset magazine/book "Transparent" the best. It is full of inspiration and eye candy. So, I hope I opened a little door of thought for you today.

Wednesday, June 18, 2008

Seed Packet Images


Rummaging around through an old box, I found a small treasure trove of old ephemera I had bought way back "in the day". Thought I would share these old seed packets. It is gardening time and I hope everyone is out enjoying themselves.

Sunday, June 15, 2008